The helix is just a way to get between the lower and upper decks.
It looks like this:

The inner loop radius is 36 inches. Each loop outwards is 2 inches greater in radius, making the outermost loop 40 inches.
This ate up a lot of track. The inside loop is about 1642 inches long, which will require 46 3-foot sections of flex track. That's a scale 2 1/4 miles. The first loop out is 1696 inches long, using 48 sections, equaling 2 1/3 miles. The next track out is 1592 inches long, taking 44 sections, equaling 2.19 miles. The outer track is about 1338 inches long, which will require 38 3-foot sections of flex track. That loop equates to 1.84 miles. Total mileage in the helix is about 10.34 miles! Holy cow!!
In case you're wondering, the reason the lengths of the loops varies as it does is that each track makes a slightly different number of turns around the helix between where it enters and where it exits.
I haven't put any crossovers or passing tracks or such in the helix - I wanted it to be as simple as possible mechanically.
The helix is completely unscenicked.
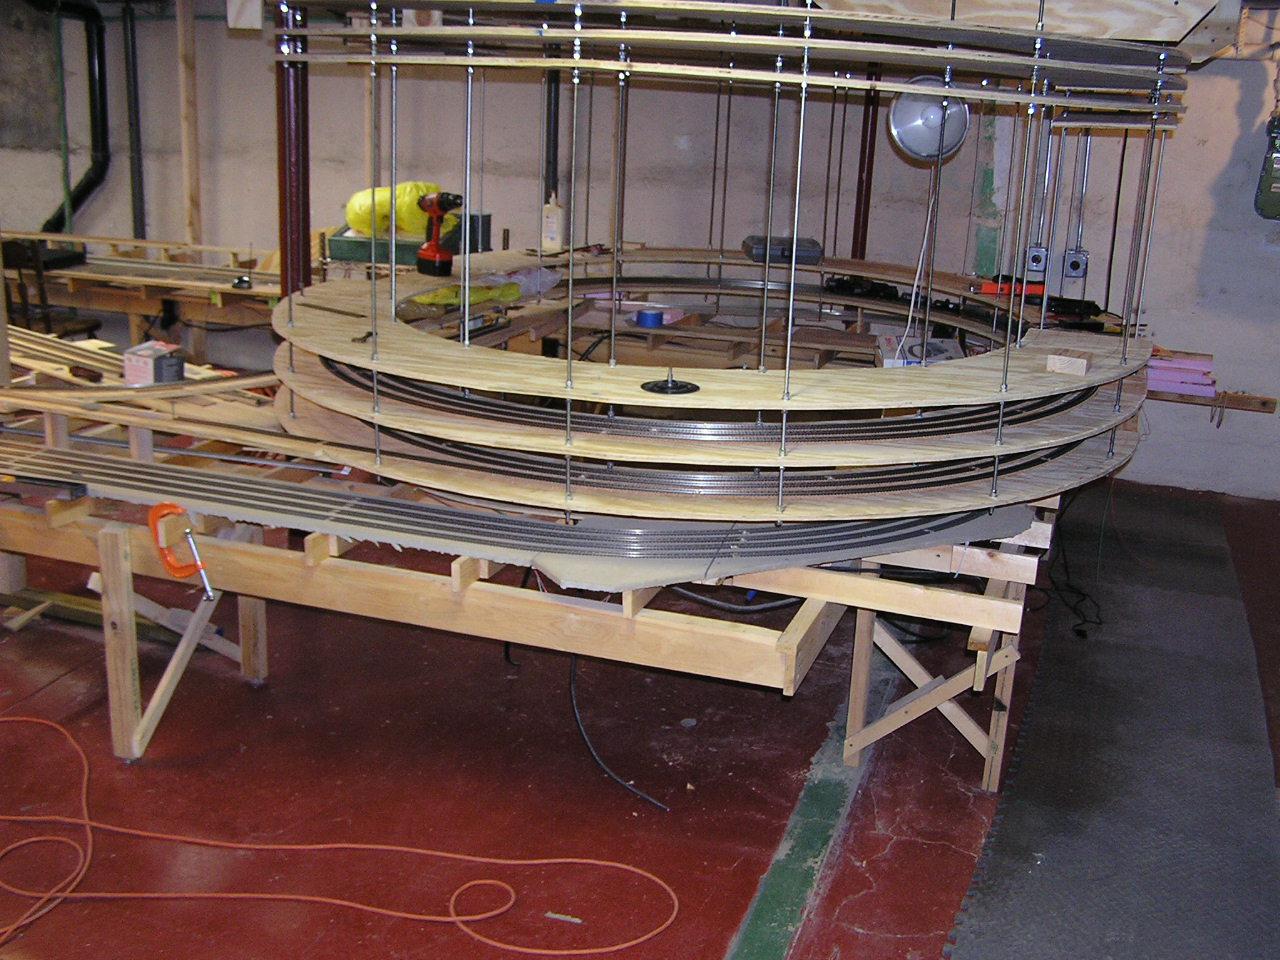
 Here's a shot of the helix at the beginning of construction. It occupies about 65 square feet of floor space - a tad bit more than two 4X8 sheets of plywood.
You can see part of Seattle staging underneath.
The helix was a suspension type, with a 3/4" birch plywood header at the top. Nothing magical about using birch - it was on sale and cheaper than standard 3/4" plywood.
Long threaded rods were installed to support the helix tiers. Each set of curves were installed on the bottom of the threaded rods and slid to the top, with washers and nuts (LOTS of nuts) being run all the way up the rods to support each tier. You can see the top tier all the way up near the header, and the next tier down is about ready to be run up.
 Here the helix is more or less halfway through construction.
This gives you a good idea of how it was built. All tiers were run up to the top of the rods, and each tier in turn was lowered down into final position, attached to tier immediately below, then roadbed and track were added.
Electrical connections were added in the straight sections halfway around each tier. Flextrack was soldered at the rail joiners in all curves as it was added (that's my standard practice to eliminate kinks in curves. Small gaps were left in the straight sections to allow for expansion. Rerailing sections were also placed in each straight section. I wanted trouble-free operation of this baby!
 And here's the helix complete!
All in all it took 364 days to complete, with only what other construction work was required to support building the helix, like installing track behind the helix where it would be difficult to lay track after the helix was in).
Quite an undertaking! Too bad it came down before ever being used.
Check out this Helix Construction Page for a lot more detail on the design and fabrication of what I came to call "The Behemoth Helix."